Share this Image On Your Site
So you want your yard to look like a baseball park, or you just want to stand out from the neighbors? Maybe you’re just bored with the regular old mowing job you do every week or two. No matter your reason, mowing patterns, stripes, checkerboards or even diamonds into your yard landscape isn’t so difficult.
Patterns in grass are made by light reflecting off the blades. If the blades bend toward you, they look darker, and conversely, the ones that bend away from you look lighter. You’ve probably noticed this somewhat when you do your regular grass cutting. It’s much the same as the way a vacuum cleaner can make stripes in your carpeting.
If you have imperfections in your yard, mowing stripes or patterns is also a great way to mask them. When you mow designs, it breaks up the lawn visually, so if you have areas with a slightly different appearance, they’re harder to see.
Types of Grass
Another thing that affects how your stripes will look is the type of grass growing in your yard. Warm season grass is usually harder to stripe because they don’t bend as easily as cool season varieties. If you want the most intense stripes, try growing varieties like perennial ryegrass, tall fescue, Kentucky bluegrass or fine fescue.
Stripe Intensity
The intensity of the stripes can be changed by how high you leave the grass. Shorter grass will show a less intense stripe, as there is less surface area for light to reflect. So, if you want the most intense stripes, mow it to only about 3” – 3.5” high.
Striper and Roller Attachments
The easiest way to accomplish this is with a lawn striping / roller attachment for your lawnmower (the roller will flatten the grass further, making the pattern more intense). These lawnmower add-ons can be purchased, or you can build your own as well if you’re a do it yourselfer.
How to make your own lawn striping kit for under $10
Some people use only a basic do-it-yourself lawn striper attachment, but if you really want your stripes or pattern to look professional, you really need to bend those blades of grass over. That’s where a rally good roller comes in. It pushes down the grass, forcing it to bend so the pattern is more apparent. You can achieve this on your own, but you do need to make sure your roller is heavy enough to get the job done well.
Consistency
To achieve the pattern in your grass just the way you want, consistency is very important. Always mow going forward, never backward. Also, make sure your stripes slightly overlap each other. Otherwise, you’ll end up with thin strips that are uncut between your stripes. It might take a little bit of practice, but in a short time, you’ll be striping like a pro.
The most important thing to remember is to be precise. As you follow the pattern, make the straightest lines you can. When you start a new row, be careful to line up the wheels exactly to give the most consistent appearance.
Hints for Getting the Best Effect
- Cut the grass when it’s dry. If it’s wet, your pattern is more likely to look matted.
- Keep your mower blades sharp for a nice, clean cut.
- Don’t take off more than 1/3 of the grass length at one time.
- Consider how your overall pattern will look with the rest of your landscape before you get started.
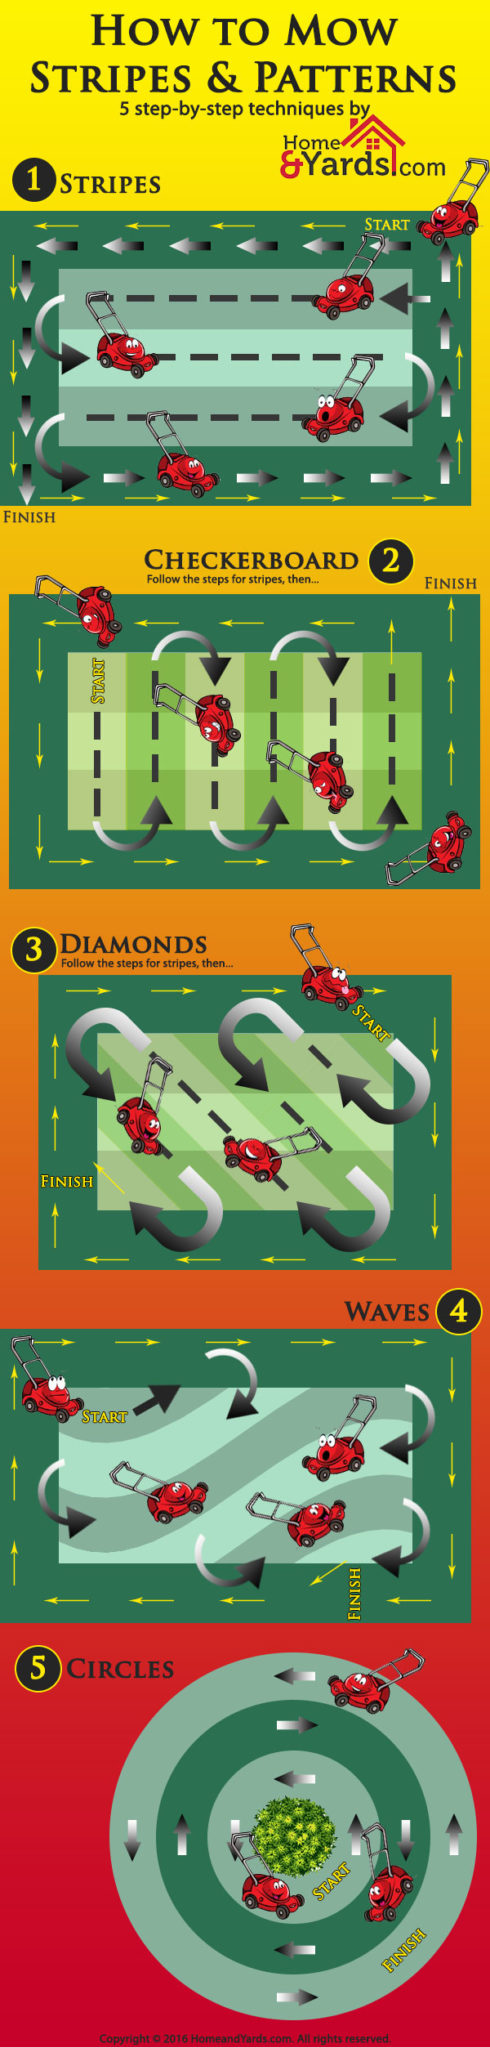
How to Mow Stripes
- Decide where you’re going to turn the mower. If you have driveways or sidewalks around your yard, you can do it there and stripe the whole thing. If you don’t, you’ll need to mow once around the perimeter, and this is where you’ll make your turns.
- When you get started mowing, make a stripe in one direction, turn, and then make one in the opposite direction. Continue this process for the whole yard.
- Once complete, go over the perimeter once more in one direction. This will clean up any spots you missed as you were making your turns.
How to Mow a Checkerboard
- Make a perimeter pass just like above.
- Same as above – mow your stripes in opposite directions.
- Now, make stripes in the same way but going in the opposite direction of the first stripes you made. This creates the crisscross pattern.
- Mow the perimeter going in one direction to clean it up.
How to Mow Diamonds
- Follow steps 1-2 of the Checkerboard pattern.
- Instead of mowing the next stripes opposite, mow them in a diagonal direction.
- Go around the perimeter once.
How to Mow a Wave Pattern
- Cut the perimeter as above.
- Mow as if you were creating a stripe, but instead of going in a straight line, make it a wave. Yes, your neighbors might think you’re drunk if you’re doing this, but wait until they see the payoff!
- Go in the opposite direction for wave / stripe number two, slightly overlapping the last wave. Continue in this manner until your yard is done.
- Go over the perimeter once more.
How to Mow a Circular Pattern
The circular pattern can be done on a large section of your yard, but it also works really well if you want to go around flagpoles, trees or other objects. If you end up with any uneven areas between your passes, you can rake the grass to get closer to perfection.
- Mow the perimeter.
- Start at what will be the center of the circle, and mow the smallest circle you can.
- Then, go in the opposite direction around the outside of the first circle, slightly overlapping it. Continue like this until you have as many circles as you’d like.
- Finish off by mowing the perimeter again.
Striping or making other patterns on your lawn not only looks professional, it definitely adds to your curb appeal. With a little practice, you can get even more creative and have the neighbors asking how you did it!